Tuesday, April 24, 2012

Why "The Allergy Safe Kitchen"?

I love to see my kids invested in, and excited by their cooking! 
This is critical life-training for all food allergic children!

I've been meaning to write this particular post for a while now, but today I read an article that prompted me to sit down and devote some time to explaining why "The Allergy Safe Kitchen". The article was brought to my attention through Robyn O'Brien's "Allergy Kids foundation" FB page. In it, a 19 year old girl describes her life with a peanut allergy and how it has contributed to panic attacks, anxiety, and a battle with an eating disorder.  She equates food with possible death, and feeling empty/hungry with being safe.  She claims her parents didn't make her fresh food because it was too much trouble.  Which means that they also didn't teach her to cook safe food for herself.   She is being sent out into the world without the skills to keep herself safe and healthy. She is afraid of food. Is your heart breaking yet? Mine is. 

One of the reasons I started this blog, was to empower parents of food allergic children to cook - and to teach their children to cook.  Those with food allergies need the kitchen to be a safe place, a place of control, a place of empowerment - not a place of fear and confusion. 

My children walk out the door, and nearly every single place on earth offers a potentially deadly danger from substances that most consider highly nutritious foods.  Peanuts, eggs, dairy...we are told these are all fundamental parts of a balanced diet, thus, most families eat them.  That means every playground, every store, every public place and lots of private residences are places where my children could encounter an allergen.  The chance for accidental contact is high and often times overwhelming.  A good friend of mine is afraid to take her daughter to the grocery store anymore, because she has had such severe reactions from riding in the "kiddie carts" that are often available in supermarkets.  There is an underlying and constant, serious stress that lies in the hearts and minds of our food allergic children and loved ones.  Every social event is cause for them to go on high alert.  And that is why it is not enough for us to have just one safe counter space, one safe spatula, or one area of a pantry that contains safe food.  That is why we have chosen an "Allergy Safe" kitchen for our family.  A kitchen that doesn't contain foods they are highly allergic to;  a safe pantry, a safe fridge, a safe counter, and safe utensils.

"The Allergy Safe Kitchen" allows my children the chance to let go of that underlying stress that will accompany them everywhere they go in their lives.  It gives them a space to exhale, to feel safe, to feel confident in their health.  To borrow a phrase from Dr. Phil - it gives them a "soft place to fall." Our kitchen is a place of learning, of becoming "friends" with food, of feeling welcome, of time with family.  Our whole kitchen is a safe place for EVERY member of our family. An added bonus to having an allergy safe kitchen is that  my non-food allergic children are learning compassion when we explain that we don't have certain foods in the home in order to protect our loved ones.  Eliminating potentially unsafe foods from the home can be rewarding on many levels!

Parents - learn how to cook safe food for your food allergic children, and then teach them how to do it. Turn your kitchen into an allergy safe kitchen that is a safe and welcoming place for EVERY member of your family. If the grocery store is safe for your food allergic children, take them with you and teach them to read labels and become discerning consumers. Kids, teens, young adults, take charge of your health, learn to cook, become informed, and speak up for yourselves at social events and with your friends.

A final note to allergy parents: your children will have plenty of opportunities to navigate the scary world of possible cross contamination - don't let those opportunities be in your home.  Let your home and your kitchen be the places where they can exhale and feel the stress melt away.  A place for peace can be a highly impactful gift to your children.


 As always, from The Allergy Safe Kitchen, I wish you "Good Cooking, and Safe Eating"!

Tuesday, April 10, 2012

Color me Converted to Chia!

When I first was learning how to bake without eggs, I learned the water+oil+baking powder substitute, and after the Ener-G company went nut free, I embraced their boxed egg substitute.  Because both worked fairly well, I never really experimented with any "new-fangled" substitutions...like flax or chia...boy was I a ninny!  Let me tell you, dear readers, I am impressed with my chia experiment!


I made delicious "Double Chocolate Cake Cookies" last week...

And then I made them again this week with chia gel instead of my standard water/oil/baking powder mixture.  The cookies were fluffier and more moist than my original batch! 

Fluffy, soft, cake-like...dairy-free, egg-free...chocolate nirvana!
Chia seeds are high in omega-3s, protein, and fiber. They can absorb up to 9x their size in liquid!  Once they are converted to a gel, they are tasteless and act as a binder in baked goods!

I found A LOT of different recommendations for the proper chia to water ratio for use as an egg replacer; these were the most common:

2 tbsp whole chia seeds to 1/4 cup water (equivalent to 1 large egg)
2 tbsp ground chia seeds to 1/4 cup water
1:9 ratio (standard chia gel recipe)
(Mix each of these combinations in a glass jar or cup and let stand for 15-20 minutes) 

For my cookies, I needed the equivalent of 2 eggs, so I started by adding 4 tbsp of whole chia seeds to 1/2 cup of water.  After letting it sit for 15 minutes, the gel was so thick, I didn't trust that it would add the needed fluidity to the batter, so I added 3 tbsp more water.  After about 10 more minutes, the consistency seemed right...it seemed, "eggy"! 

I was really pleased with the outcome! The cookies are dark chocolate, so I couldn't really see any "whole" dark seeds in the finished product.  I'm going to try the ground chia seed in my pancake recipe this weekend.  I'm hoping the yield will be fluffier pancakes than we've had since going egg-free! 


So...in the interest of full disclosure...I've been eating the chocolate cookies while writing this post! (Now that's dedication for you...)


As always, from "The Allergy Safe Kitchen", I wish you "Good Cooking, and Safe Eating"!
Monday, April 9, 2012

Chicken and Dumpling Soup


Chicken and dumplings...I'm salivating already, pardon me while I wipe the drool off of my keyboard.  I've always shied away from making dumplings because I thought they sounded complicated, or like something a grandma would make, but not a busy mom like myself.  To be honest, most of the recipes for dumplings that I've come across online and in my cookbooks, use either eggs or milk or both.  I found this recipe on an old magazine clipping in my pile of "desk junk", and I gave it a whirl, with a couple alterations! Warm, hearty, comforting, and surprisingly simple, this recipe will prove to be a "go to" dish on a chilly day! 

*This recipe is egg-free, nut-free, peanut-free, dairy-free, shellfish-free, fish-free, soy-free.  As always, read your labels and the recipe carefully to determine if it is safe for you and your allergic loved ones!

Ingredients:
4 pounds boneless, skinless chicken thighs,
   cut into large pieces
Skim the foam as the soup cooks.
2 onions, chopped4 celery ribs (including leaves), chopped
8 carrots, peeled and chopped in 1 inch chunks
4 quarts chicken stock
Kosher Salt
pepper
fresh parsley for garnish, chopped

Dumplings:
3 cups flour
Kosher salt
4 tbsp. canola oil
2 1/4 cup water

Directions:
- Place chicken pieces, carrots, celery, and onion in a large Dutch oven (or large soup pot)
- Add chicken stock, salt pepper and bring to a boil over high heat.  (Skim off any foam that rises to the top during the cooking process.)
- Reduce the heat to low and cover with snug fitting lid. Simmer for about 50 minutes or until chicken is tender.

You can see my "cuts" are not
uniform, but you'll be surprised
at how fluffy and light this
dough feels as you work with it!

- While the soup is cooking, make the dumplings. Place flour, salt and oil in a large bowl and slowly add the water, stirring, to make a dough. 
- Turn dough onto a floured surface and knead briefly - DO NOT overwork the dough!
- Roll dough to about 1/4 inch thick, and using a rolling pizza cutter, cut the dough into roughly 1 x 3 inch slices.
- After the soup has cooked for about 50 minutes, carefully slide the dough strips into the pot (still simmering), trying not to crowd them in one big clump. COVER TIGHTLY (you need the steam created for fluffy dumplings), keep heat on low and cook for about 10 minutes. 
- Sprinkle with parsley and serve!

This soup was a big hit in our house, and frankly, it was so easy to make the dumplings, I don't know why I would ever add boxed noodles to my soup again!  So there you have it, dear readers, dumplings aren't just for grandmas!


 As always, from The Allergy Safe Kitchen, I wish you "Good Cooking, and Safe Eating"!
Monday, April 2, 2012

Tasty Lunch - Tuna Lettuce Cups


I made one of my favorite tasty lunches today!   Tuna lettuce cups!  This is a great, versatile, kid-friendly cold lunch.  I find it is an easy way to incorporate veggies into a "kid-meal" and every time I make it, it's a little bit different, depending on what is in the fridge!  Here's what I used today:

Ingredients:
approx. 20 oz of canned tuna in water (drained)
Veganaise
Juice and zest of 1 lemon
fresh chopped parsley
fresh chopped dill
1 stalk, plus leaves chopped celery
1 shredded carrot
chopped bell pepper (any color)
crumbled bacon
halved cherry tomatoes
Endive spears for serving
      *Please check the labels when you purchase prepared products, like tuna and Veganaise, to make  
        sure it is a safe choice for your food allergic loved one!

Directions:
Mix tuna, lemon, celery, carrot, chopped parsley and dill, and peppers.  Add as much Veganaise as you like (less for a drier mix, more for a creamier mix).  Spoon tuna salad into endive spears and place two tomato halves on each spear.  Sprinkle with crumbled bacon and serve! 

These lettuce cups have a fresh, light, spring feel, but they are surprisingly filling!  I usually add some red onion or scallions, but we didn't have any in the fridge!  Sometimes I use different herbs or none at all - which is the beauty of this dish - add what you like/have on hand, and leave out what you don't!  For an extra garnish, you can shred some cheese (dairy or soy) over the top as well! 

As always, from "The Allergy Safe Kitchen", I wish you "Good Cooking, and Safe Eating"!

Friday, March 30, 2012

5 Minute Cake in a Cup


My husband has been working on a big project, and has been bringing work home every night this week.  Some nights he has worked until the wee hours of the morning; it has been a long and tiring week for him.  Last night he went digging around the kitchen looking for something "dessert-ish".  (I've been trying to lose some weight and I have been depriving the poor man of my usual baking efforts.)

I had run across a recipe for a microwave mini-cake earlier in the day, so I grabbed it and went to work!  It took me a few minutes to figure out some substitutions and after that - my husband had warm, yummy chocolate cake in 5 minutes!  Really - 5 minutes to gooey, decadent cake!  Here's my revised recipe and strategy:

"5 Minute Cake in a Cup"
Before microwave...
1 large (mocha style) mug                                                               
1/4 cup of unbleached flour
1/4 cup plus 1 tbsp granulated sugar
2 tbsp dark cocoa powder
dash of kosher salt
3 tbsp vegetable oil (whatever kind is safe for you)
3 tbsp vanilla flavored coconut milk (or soy milk)
1/4 tsp vanilla extract
2 tbsp water mixed with 1 1/2 tsp powdered egg replacer

Whisk dry ingredients together in the mug.  Add wet ingredients and whisk everything together until smooth.  Microwave for 2 minutes and 20 seconds (or until slightly puffed and not wet on top).  Top with a sprinkle of cocoa powder or powdered sugar and serve warm! 

...After microwave! I don't know why the cocoa powder looks so orange!
 It may not be the prettiest cake, but it's DELICIOUS!
  I also doubled this recipe (mixing it in a large bowl) and was able to divide the batter into 7 "tasting cups" for a perfect kid-sized sweet snack!  I placed all the tasting cups in the microwave at once and it took about 4 minutes for them to cook. Check out the reviews from my children:

I hope you enjoy this quick and easy dessert!  As always, from "The Allergy Safe Kitchen", I wish you "Good cooking and Safe eating"!
Saturday, March 17, 2012

Whipped Potatoes

Oh, the silky, indulgent lure of smooth whipped potatoes with good gravy...sounds yummy, doesn't it?  Here are a few of my tips for making delicious mashed potatoes:


  • Use gold potatoes (Yukon gold, butter potatoes, always organic if you can)
  • Cube potatoes in pieces no larger than an inch for quicker, more even cooking
  • Drain your potatoes REALLY well, return them to a the hot pot and let them give off that steam, the more moisture you let them   release before whipping, the better!
  • Substitute a little chicken stock for milk and use Earth Balance Spread (not the baking sticks, the spread that comes in a tub!)  I use one full container of Spread for 10 pounds of potatoes. (Oh yes, 10 pounds...we are a family of 9 and we LOVE our mashed potatoes.)
  • Don't forget to add a generous amount of kosher salt! 


Do the first round of smashing with a traditional potato masher and then....using a hand mixer, whip the potatoes to desired consistency and enjoy!


 As always, from The Allergy Safe Kitchen, I wish you "Good Cooking, and Safe Eating"!


Saturday, February 25, 2012

Hearty, Sweet Sandwich Bread

My son was allergic to wheat for a long time.  Not being able to have soft white bread was tough.  We muddled through with rice bread, but let's be honest, it isn't the tastiest stuff! (There are a lot more options on the market now!)  I tried to make my own, but with an egg allergy and a dairy allergy to boot - gluten free baking became even more challenging. I gave up and started eating corn tortillas!

When he outgrew his wheat allergy I tried several egg free, dairy free bread recipes, and this one is sweet and dense and hearty.  It makes meal sized sandwiches, amazing cinnamon toast, and it's a great complement to any chili!  I remember the first time I made it, I just kept saying "This is the best bread EVER!" (I may have also been moaning with food pleasure!) I hope you enjoy it!

I served this bread tonight at a dinner party and it was a big hit!  YUM!

Sunday, February 12, 2012

Time to Re"stock" the freezer!


All the veggies in the pot at the start of cooking.
The kitchen smells great today!  It's "restocking" day!  Store-bought stocks/broths can be full of MSG, unlabled "flavorings", and other additives and preservatives.  Some broths are clarified using egg-whites and egg shells.  With a life-threatening egg allergy in the house, I don't want to take any "mis-labeling" chances, so I make my own stocks; chicken, vegetable, and beef.  I make the stock and then freeze it for use in recipes, or to make homemade soup any time someone gets the sniffles! 

When I first decided to make my own stock years ago, I was a little intimidated!  I thought it was only something that professional chefs, or seasoned home cooks could pull off.  Boy was I wrong!  This is one of the easiest ways to "stock" (hee hee) your freezer with safe ingredients for your family or food allergic friends.  YOU control every ingredient that goes into the pot!  You don't have to worry about all that extra "stuff" that can aggravate the allergic body.  You can use your stocks to make soup, pan sauce, gravy, stir fry, and it's a great way to add flavor to rice instead of boiling it in plain water!  So here's what you need to know to set yourself up for some serious success in your YOUR allergy safe kitchen!

Chicken Stock:

I give instructions for making chicken stock in my YouTube video, "Leftover Chicken". Click on the link and get the recipe! In the video, I used the carcasses from four roasted chickens, you can use fewer roasted chickens if that's what you have available, OR you can use whole uncooked chickens.  If you use raw chickens, take the meat off the bones after it is fully cooked and return the bones to the stock pot to continue cooking!  Reserve the meat for chicken soup or use for lunch! 
Vegetable Stock:

This one couldn't be easier.  The basic process is: chop, boil, strain, freeze.  That's it. As you read this recipe, keep in mind that you can adjust any of the quantities to fit your needs or tastes.  If you are allergic to any of these ingredients, leave it out and replace it with a veggie you like!  For example, I omit tunips and parsnips because I don't care for them; I add mushrooms for deep flavor and color.  Here's the combination I that I have come to use:
     1 whole head of garlic with the top trimmed off
     4 cooking onions, quartered
     1 full leek
     6 medium carrots
     4 stalks of celery plus all the leaves I can pull off the bunch!
     1/2 lb cremini mushrooms, halved
     1/4 tsp whole peppercorns
     6 springs of parsley
     6 sprigs of thyme
     2 bay leaves
     14 cups of water
Place it all in a dutch oven or big pot, let it boil and then reduce to a simmer.  Continue cooking for 1 hour (or a little longer, there's no exact science here!).  Cool, strain and freeze!  SO simple! 
Yield is about 8 cups
*An easy way to gather ingredients is to have a big zip-top bag in the freezer labeled "FOR STOCK".  Any time you have an odd or "almost-on-the-edge" carrot/celery/fresh herb/onion/leek/greens leftover, toss it in the bag and freeze it.  When it's time to make stock, add the contents of the bag into the pot!

Beef Stock:

I think this is the most labor intensive of the three, but the reward is worth the effort!  Here's what you'll need:
     7 lbs of beef marrow bones, cut into 2 inch pcs.  (ask your butcher to do this)
     6 oz can of tomato paste
     3 stalks of celery with leaves, chopped
     2 medium yellow cooking onions, chopped
     2 medium carrots, chopped
     1 head of garlic, cloves peeled
     6 sprigs of fresh thyme
     6 bay leaves (I use fresh, but you could use dried)
     1/2 tsp whole peppercorns
     2 cups of your favorite dry red wine (use organic if possible)
     24 cups of water ( I have an 8 cup measuring cup that I fill 3 times!  That's how I got this
                            measurement)
Preheat the oven to 450 degrees F.  Place the bones on a roasting pan for 1 hour.  Then remove the pan from the oven and turn it down to 400 degrees F - smear the bones with the tomato paste (use a small spatula).  Lay the vegetables over the bones and roast at 400 degrees F for 30 minutes.  Place the roasting pan on the stove and use the 2 cups of wine to deglaze the pan, scraping up the browned bits with a wooden spoon.  (those browned bits are flavor - get 'em all!)  Place EVERYTHING from the roasting pan into a big stock pot and add peppercorns, garlic, and herbs.  Season with kosher salt and add the water.  Bring the mixture up to a boil and the reduce to a simmer.  Simmer for 4 - 4 1/2 hours.  Cool, strain, and freeze! 


The fat will rise to the top as it cools.  Let it solidify in the fridge and then scrape the fat off the top!
Part of this batch is going to be French Onion Soup for a romantic Valentine's Day dinner after the kids are in bed!

I am pleased with my efforts today! Remember, you don't have to cook like this every day!  If you put in this sort of effort and planning every once in a while, you'll set yourself up to have safe ingredients for "quick" meals when you need them! 

As always, I wish you "Good Cooking, and Safe Eating"!
Friday, February 3, 2012

Superbowl Feast - Chicken Quesadillas!

Chicken quesadillas are a fairly frequent lunch in our home, and they make a great addition to a Superbowl Feast!  I always have tortillas on hand, both wheat and corn, and quesadillas are a great way to utilize leftover veggies, leftover meats...really, anything you want to put in there!


 I like that this is an easy meal to customize to each child's taste, just let your child choose what goes in and you'll eliminate any "picky eater nonsense"! (Or let them sprinkle it in themselves if they're old enough to be by the stove!) 

Possible Ingredients:
- chicken
- ground beef
- steak
- bell peppers
- scallions or red onions (we've used carmelized onions...so yummy)
- tomatoes
- salsa
- bacon
- cucumbers
- sliced mushrooms
- soy cheese
- dairy cheese (since we have only mild dairy allergies, we do allow our dairy in our kitchen - this 
                        was not always the case)
- shredded carrots
- ANY leftover veggie!

After getting your counter organized with the chopped/sliced/shredded items you want to incorporate into your quesadillas, heat a little oil in a cast iron skillet or a non-stick pan (use hard adonized if possible - no leeching chemicals) on medium-low. 

Place one torilla in the skillet and sprinkle your fillings over the whole surface.  Cover with a second tortilla and slowly heat through until the bottom is crisp and golden.  Flip the torilla carefully using a large spatula.  Heat second side slowly until golden brown.  (Heat on low to medium-low, you want any cheese/soy cheese to have time to melt!)


Let the quesadilla cool on a cutting board for a minute or two, the cheese/soy cheese will be HOT!  Using a pizza cutter, slice into 6 wedges and serve with small "dipper cups" of dairy-free sour cream, and salsa! Enjoy!

From "The Allergy Safe Kitchen", I wish you "Good Cooking, and Safe Eating"!
Tuesday, January 31, 2012

Chocolate Covered Pretzel Rods

The Superbowl is near and the children of our household are all aflutter!  It isn't because we are die-hard football fans, (although I do love a good football movie!), it is because it's the only day of the year we let the kids eat dinner in the family room!  As soon as Superbowl time draws near, the pressure to create a fun and tasty football feast is on!  

One of our family favorite, salty and sweet snacks for game day is a perfect one for parents and children to make together: Chocolate Covered Pretzel Rods! 


Roast Chicken - It's what's for dinner, and lunch, and dinner....

Go to youtube and check out my latest show, in three parts - Roast Chicken!

Learning how to make roast chicken can help give you plenty of raw material for many meals: chicken dinner, chicken salad, chicken stock, chicken gravy, chicken soup, chicken tacos...and the list goes on!

For all of the families just starting out in the "allergy world", this is probably the first roasting endeavor you should master, assuming that your family is not allergic to chicken.  (That isn't a joke, there are those who are allergic to the oils present in the chicken skin.)  But if chicken CAN be on the menu at your house, head on over to youtube and learn how to open up a world of safe meals for you and your family without having to break the bank with expensive "allergy friendly" products! 

"Allergy Safe Kitchen" presents:  Roast Chicken, part 1


Friday, January 27, 2012

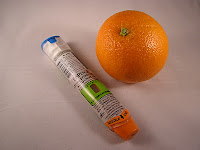
What to do with an orange in "The Allergy Safe Kitchen"

Sometimes fruit gets treated a little differently in the kitchen of a food allergic family.  In our house, the oranges better look out.  They are a delicious fruit and so useful for juices, keeping poultry moist, and having on hand as a healthy snack.  But here's a secret about the bright and cheerful orange: it can be used to train people to save lives!  Yes, that's right!  The humble orange can help you teach care givers, grandparents, and even your children how to use an Epi-pen correctly. 


Epi-pens come with a needleless trainer, and we have used them to train others in the proper technique of administering the Epi-pen, but there's nothing like practicing with the real thing.  Before you throw away that expired Epi-pen, or the one you left in the car, (heat or cold - we've all been there), grab and orange and someone to train!  The skin and flesh of the orange are a good mimic for what it might be like to administer the Epi-pen through a pair of pants.  This little training experience has helped our babysitters, grandparents and instructors feel more knowledgable about Epi-pen administration.  When our son Aidan started carrying his own Epi-pen in a belt, we had him practice on an orange or two, and I think it has helped him to understand a little bit more about what the Epi-pen is and how it works. 

So the next time you find yourself ready to replace an unused Epi-pen with a fresh one, head to the store and get an orange!  Train someone to save a life! 

As always, I wish you "Good Cooking, and Safe Eating"! 

Oranges - training everyday heros in your kitchen!
Sunday, January 22, 2012

Broccolini Basil Spaghetti

Head on over to my youtube channel to see the latest installment of our "in home" cooking show, "Allergy Safe Kitchen"!  We're making Broccolini Basil Spaghetti. 

"Broccolini" is the trademark name, and the actual vegetable is sometimes labeled as "baby broccoli" or "broccoletti".  Is is a hybrid of broccoli and Chinese kale.  If you cannot find it in your grocery store, feel free to substitute regular broccoli in this recipe! 

http://www.youtube.com/watch?v=CRxnM8A8GQ8&context=C388e208ADOEgsToPDskL5cBzuVqvj3Xc4xBD_tqfY
Friday, January 20, 2012

Before and After - a cook in the making...

When my husband and I first married, I knew how to cook very few dishes from scratch.  I was always calling my mom to find out how to do this or that, and I depended on a fair amount of box/frozen meals to round out our dinners for the week.  I made spaghetti sauce from the jar, defrosted meatballs from a bag, and popped frozen texas toast in the oven,  and I really thought I was COOKING, baby.  And truly, for a newlywed, it wasn't bad! 


I went from defining "baking" as boxed mixes and canned frosting to from-scratch dairy free, egg free, peanut/nut free cake, frosting, and fondant. If I can evolve like that, so can you!  This cake was made at a beach cottage for my sister-in-law's baby shower!
Tuesday, January 17, 2012

A Love Note about "Enjoy Life" Mini Chips

Finding allergy friendly chocolate is SO difficult!  When Aidan was first diagnosed with food allergies (about 7 years ago), there weren't that many companies that specialized in making allergy friendly food.  When Enjoy Life came on the scene in our local grocery stores, it was right around Easter (several years ago).  I couldn't afford to send away for the expensive "safe" chocolate bunnies, which you have to order WAY in advance, so  I was trying to find creative options for the kids' Easter baskets, and browsing through the tiny organic section in our local chain supermarket. My eyes fell on a new product:  "Enjoy Life Mini Chips".  The other organic chocolate morsels our store had always carried were dairy-free, but they had the dreaded "may contain" statement for peanuts and tree nuts.  But HERE was a beautiful bag of hope in the form of mini chocolate chips!  I read the label 5 times, just to be sure I could trust what I was seeing!  Enjoy Life products are free of all top 8 food allergens!!!  My kids could finally have chocolate in their Easter baskets? I could concoct CHOCOLATE CHIP cookies?  I could put morsels in our rice flour pancakes as a special treat?  My mind went spinning with birthday desert possibilities!  I am not ashamed to say that I cried right there in organic section.  It was like we were being gifted with a small bit of what other families would describe as "normalcy".

An acquaintance from church saw me and I was so excited that when she asked if I was okay, I could only choke out "They can have chocolate!"  I really don't think she knew what to make of the whole situation, but she knew our children had life-threatening food allergies, so she gave me a big hug and said something along the lines of "I'm sure that's wonderful news!"  As anyone on the inside of a food-allergy lifestyle knows, those on the "outside" don't always understand how hope-filled these seemingly small triumphs can be.  I am grateful that this particular acquaintence just "went with the moment" and shared my joy. 

We have used this one ingredient to create countless special treats, birthday desserts, molded chocolates...we used them in the Peppermint Patty recipe featured earlier on this blog! 

So, from my family to the Enjoy Life company:  Thank you.  We love you! 


 As always, from The Allergy Safe Kitchen, I wish you "Good Cooking, and Safe Eating"!

Monday, January 16, 2012

Make Your Own Pizza Night!

Nearly every family has pizza night once or twice a month...or week!  This convenience dinner IS still possible for families dealing with food allergies.  With a little preparation, you can be eating homemade, personalized pizzas in "take-out time". 


First, the dough.   If you are fortunate enough to be able to use a ready made, refrigerated dough, by all means, make your life easier, and use it! If not, here is one of our favorite recipes:

*Egg-free
*Peanut-free
*Tree nut-free
*Dairy-free
*Soy-free
*Shellfish-free
(If you have other food allergies, please read the recipe carefully to determine if it is safe for your needs.) 

For a Basic Pizza Dough -

1. Dissolve 1 Tbsp sugar in 1 1/3 cups of warm water. 
2. Sprinkle 1 packet of dry active yeast on top of the water (1/4 oz packet). 
3. Wait about 10 minutes, until the yeast is foamy and then stir in 3 Tbsp extra-virgin olive oil. 
4. Combine 3 3/4 cups cups of flour and  1 1/2 tsp of salt in a large bowl. 
5. Make a well in the middle and add the wet mixture. 
6. Stir to combine and then turn the dough out onto a floured surface.
7. Knead for about 5 minutes, or until the ball is smooth and elastic. 
8. Form into 2 balls, coat each in olive oil, put in bowls and cover the bowls tightly with plastic wrap.
9. Leave the 2 bowls at room temperature for about 1 1/2 hours until the dough has doubled in size. 

*At this point, you can roll out, top, and bake the dough OR you can wrap it in plastic wrap and freeze it for up to a month!

10.  For a regualr sized pizza bake at 475 for 15-20 minutes - depending on topping load and desired crispiness!  (When we make 'mini-pizzas'  we start checking them at 10 minutes.) 

One of the great things about this dough, is that if you double or triple this recipe and freeze the dough balls, you can have enough fresh, safe pizza dough to have one pizza night a week for the entire month!  This is where one afternoon of preparation can set you up for success for a month!  Use the dough to make calzones, and other dough based treats.  We've even used it to make cinnamon sugar donut holes in the deep fryer!  Food allergy families know just how expensive organic and allergy friendly convenience foods can be.  This dough can offer convenience in the kitchen without breaking the budget!

When you want to have a pizza night, simply take the dough ball out of the freezer in the morning.  Place the frozen dough in a large bowl. Coat the ball of dough lightly with a fresh layer of extra-virgin olive oil. Cover the bowl with a damp cloth or kitchen towel and leave it alone on a counter for 4 to 8 hours. At dinner-time, you'll be all set to go!  You can top it and bake it in as much time as it takes to order take-out!

Here's a list of toppings we like to use:

Follow Your Heat Vegan Gourmet Cheese  (for our dairy-free eaters)
Al Fresco Organic Chicken Sausage  (Slice and saute for pizza topping)
Artichoke hearts
Bell peppers
Mushroms
Mini pepperoni
Carmelized onions
Fresh mozarella (for our dairy eaters)
Homemade marinara sauce (I freeze it in 2 cup containers and defrost in the microwave)

Personal Pizza Pan Set
We use these mini pizza pans by "Doughmakers". They are just the right size for children, and they allow each person to make their own SAFE pizza without having to worry about possible cross-contamination of ingredients on their portion.  Children love to eat food that they have created and mini-pizzas are no exception! 

I hope you enjoy your pizza night!  As always, I wish you "Good Cooking, and Safe Eating"!

Check out my new youtube channel!

I set up a youtube channel to be a companion to this blog.  The channel will feature our "in home" cooking show "Allergy Safe Kitchen"!  Please visit and subscribe!  Many more episodes to come! 

From Sunday Brunch to Grab-and-Go Breakfast - Part 1
http://www.youtube.com/watch?v=RGY46rXbPlQ

From Sunday Brunch to Grab-and-Go Breakfast - Part 2 (plus out-takes)
http://www.youtube.com/watch?v=buysW-0TjNM&feature=mfu_channel&list=UL
Saturday, January 14, 2012

Peppermint Patties

As I watched the snow finally fall outside, I felt the urge to bake something.  Since we'd all recently had our fill of cookies, I got out a recipe for Peppermint Patties that I had tucked away.  This recipe originally came from Family Fun magazine, and I am sorry we waited so long to try it! These little beauties are scrumptious, and better yet, ALL the kids loved them!  


Welcome!

Hello everyone! Welcome to "The Allergy Safe Kitchen"!  I'm very excited about sharing my recipes and kitchen tips with you.  I have 5 children, and several of them have food allergies.  So many people in my life, especially with newly diagnosed food allergies, have asked me for recipes, tips on substitutions, hints for getting picky eaters to try new things; so I thought I might be able to help them, and others out there, by starting this blog!  Our home is currently egg-free, peanut-free, tree-nut free, and many of the dishes I make are dairy-free.  We spent several years as a gluten-free family, so this blog will include those recipes and tips here and there too.

My eldest son  is 7 years old; he has life-threatening allergies to peanuts and eggs, along with a host of environmental allergies.  When he was first diagnosed, he also had allergies to wheat, soy, dairy, and tree nuts.  Due to the high potential for cross-contamination between peanuts and tree-nuts, we still do not eat tree nuts.  After blood and skin tests suggested it was safe, we have successfully integrated dairy, wheat and soy into his diet. 

My 6 year old daughter, was recently declared "allergy-free" after spending her life up to this point with a dairy allergy.  While she still prefers organic, soy-based products, we are slowly integrating dairy into her diet. 

My soon-to-be-5 year old son, has no confirmed food allergies, although we notice significant behavioral problems when he eats dairy.  When he does not eat dairy, his tantrums are rare and mild.  When he eats dairy, his tantrums are record breaking in length and...shall we say, stubborness?  We strictly limit his dairy intake and err on the side of giving him a nearly dairy-free diet. His blood tests show no evidence of a dairy allergy, but his behavior suggests otherwise.  It's important to remember that allergies can manifest themselves in different ways.

My 3 year old son, is the only child who appears to be completely allergy-free, praise God!  He is also the only child of ours for whom we delayed vaccines until 6 months.  Just an interesting side note to share... 

My 1 year old son, was diagnosed at 3 months with a dairy allergy.  He has not yet undergone any further allergy testing.

We have a range of adventurous and picky eaters at our table and I do my best to make meals that are safe, tasty, and nutritious.  I'm happy to have a forum to share everything I've learned in the past 7+ years of being a food allergy mom.  I remember how daunting it all seemed when we first heard the diagnosis and cleaned out our pantry, and I hope I can help those of you out there who are just starting your journey.  And for the veteran food allergy moms, I hope you can find new recipes, fresh tips, and the comfort of knowing you aren't alone.  Let's all walk this road together!