
Showing posts with label recipe. Show all posts
Showing posts with label recipe. Show all posts
Thursday, December 11, 2014
A Quickie with SunButter - Sunbutter Chocolate Mug Cake
Warm, soft, decadent, intense....hmmmm, it's time for a quickie! A quickie with SunButter. In the microwave. Wait. Huh? Get your mind out of the gutter, this is NOT that kind of website! Grab your kids and make this Quickie SunButter Chocolate Mug Cake for snack time!

Tuesday, November 25, 2014
Make Ahead Turkey Gravy - Thanksgiving series
It's "Kitchen Tip Tuesday - Thanksgiving Edition!" Today, I'm sharing a tried and true solution to the last minute "gravy scramble" when the turkey comes out of the oven...you know the one - wondering if there will be enough drippings, hoping the gravy doesn't turn out lumpy, all while your guests are waiting for you to sound the dinner bell. Avoid all that stress, and make your gravy ahead of time! Use turkey stock , OR chicken stock if you didn't make turkey stock ahead of time.

So here's the big secret to awesome gravy every time, it's all about the ratio:
Monday, November 24, 2014
Time for PIE! - Thanksgiving Series
It's Monday of Thanksgiving week! What can you do today to prepare for Thanksgiving Day? Make your pies! Actually, you'll assemble them, wrap them, and freeze them until Wednesday night or Thursday morning. Today, I'm sharing my recipe for Apple pie! (Filling AND crust!)
Sunday, November 9, 2014
Time for Turkey Stock - Thanksgiving Series

I
prefer to make turkey stock about a week or two before Thanksgiving. I make a lot of it, in order to make gravy,
and also to have it ready for my favorite post-Thanksgiving turkey soup. I prepare for my leftovers! Making this stock means that you will be roasting a turkey in a very simple fashion. Roasting this turkey is a means to an end,
what you really want is the carcass. It's a bit of effort now, so you don't have to work so hard on Thanksgiving, or right before it. So,
break out the roasting pan, here we go!
Wednesday, November 5, 2014
For the Love of Cranberries - Cranberry Sauce

I've already made my Cranberry Sauce for Thanksgiving. Yep, I'm that far ahead of the game, and you can be too! I make my Whole Berry Cranberry Sauce at the beginning of the month, and I preserve it. You certainly don't have to go through the process of preserving, this recipe is fantastic made the day of, or up to a week before, simply keep it in the fridge. I make 4x this recipe and I use it for Cranberry Muffins, and for Cranberry Spread. (4x the recipe yields approximately 5 quarts of Cranberry Sauce.)
This cranberry sauce recipe is peanut-free, tree nut-free, dairy-free, egg-free, wheat-free, gluten-free, soy-free, fish-free, and shellfish-free. Top 8 Allergen Free! As always, check this ingredient list and your local products to make sure that this recipe is allergy safe for your family and/or friends!
Steps marked with an asterisk (*) are child friendly for children who understand stove top safety!
Whole Berry Cranberry Sauce
Ingredients:
1
1/3 cup of granulated sugar
1
cup of freshly squeezed orange juice
1
cup water
Zest
of 2 oranges
½
teaspoon ground cinnamon
¼
teaspoon kosher salt
24
ounces fresh cranberries
 |
| I wish you could smell this! |
Directions:
1. *Combine all ingredients in a saucepan.
2. *Bring to a simmer and continue cooking for 15 minutes until thickened.
3. Ladle into warm glass jars and process for 10 minutes in a boiling water canner. OR Store in airtight containers in the fridge for up to 1 week.

1. *Combine all ingredients in a saucepan.
2. *Bring to a simmer and continue cooking for 15 minutes until thickened.
3. Ladle into warm glass jars and process for 10 minutes in a boiling water canner. OR Store in airtight containers in the fridge for up to 1 week.
 |
| Everything in the pot and ready to simmer! |
As always, from The Allergy Safe Kitchen, I wish you "Good Cooking, and Safe Eating"!
Photo Credits: Aidan Van Horn
Monday, November 3, 2014
Tilapia with Lemon Dill "Almost Aioli"

My whole family loves fish. The kids have tried a lot of different types of fish, and two of their favorites are tilapia and catfish. (These two varieties happen to be a little easier on the wallet, too!) Here's a simple preparation that lends itself to a quick weeknight meal!
Sunday, October 26, 2014
Biscuits - Dairy free, Egg free, and Delicious!
 |
| I know you can't tell in this picture, but they're still warm here. Are you drooling yet? |
This biscuit recipe is peanut-free, tree nut-free, dairy-free, egg-free, fish-free, and shellfish-free. As always, check this ingredient list and your local products to make sure that this recipe is allergy safe for your family and/or friends!
Steps marked with an asterisk (*) are child friendly!
Click HERE for more information!
2 cups unbleached all-purpose flour
2 teaspoons aluminum-free baking powder
4 Tablespoons cold butter flavor vegetable shortening (I rarely recommend the butter flavor shortening, but, in my opinion, it makes difference in this recipe.)
1/2 teaspoon salt
1 Tablespoon granulated sugar (organic if possible)
1/2 cup flax milk*
1/4 cup Seltzer water
Directions:
- Preheat oven to 400 degrees F.
- *In a large mixing bowl, whisk together flour, baking powder, salt, and sugar.
- *Cut shortening into the flour mixture using a pastry cutter, or your fingertips. Be careful not to make the mixture too warm with your hands.
- *Slowly add the flax milk and seltzer water, stirring just until a soft dough is formed.
- *Turn dough mixture out onto a lightly floured surface, and knead together BRIEFLY, just until the dough comes together enough to roll out. Too much kneading will make the biscuit tough, you don't want to develop the gluten.
- *Roll the dough gently to 1/2 inch thick, and cut with a 2 inch biscuit cutter.
- Bake on a baking sheet for 12 - 15 minutes.
- Serve while still warm!
You may substitute any other non-dairy milk of your choice here, although, I have not had great results with rice milk in this particular recipe.
As always, from The Allergy Safe Kitchen, I wish you "Good Cooking, and Safe Eating"!
Monday, October 20, 2014
Cauliflower Potato Soup

This soup is great on it's own or as a base for other dishes! I serve it as a meal with some freshly baked bread, oyster crackers, or a salad. It's creamy and mild, which also makes it a great base for my "chicken-pot-pieless", casseroles, or any other "cream-based" soups that you might want to make dairy-free!
*This soup recipe is peanut-free, tree nut-free, dairy-free, egg-free, soy-free, wheat-free, gluten-free fish-free, and shellfish-free. Top 8 Allergen Free! I've also included a vegan option! As always, check this ingredient list and your local products to make sure that this recipe is allergy safe for your family and/or friends!
Thursday, October 9, 2014
Concord Grape Jam

*This recipe is peanut-free, tree nut-free, dairy-free, egg-free, gluten-free, soy-free, fish-free, and shellfish-free. As always, check this ingredient list and your local products to make sure that this recipe is allergy safe for your family and/or friends!
Ingredients: Concord grapes (at least 2 quarts), water, sugar
Directions:
First, separate the skins from the pulp. If you've never peeled Concord Grapes before, you're probably thinking that peeling all these little jewels will take FOREVER. And while it does take a little time, it's not as hard as one might think. Concord Grapes are a "slip skin" variety of grape, which means a little squeeze at one end of the grape, sends the pulp right out of the skin!

Place the skins in one large bowl, and the pulp in another. The pulp will have seeds, but you'll be separating those out after you've cooked it down, trust me, it's easier that way.

Cook the skins over medium-low heat for about 20 minutes, with just enough water to keep them from sticking to the bottom of the pan. Cook the pulp down, over medium heat, until it is very soft.
Once the skins have cooked down, I like to use my immersion blender to break them up even more. (You can chop them before cooking them, but I find it to be VERY messy.)
I also use a potato masher to break up the pulp while it's cooking.
Strain the pulp through a mesh sieve (or use a food mill, if you're fancy like that), into the pot with the skins. I prefer to use a wooden spoon to mash the pulp through, so I'm truly left with only the seeds and really stringy pieces in the sieve.
At this point you may want to stop and wipe the drool off of your chin so it doesn't contaminate the jam. Oh, and resist the urge to put your face in the pot to smell the goodness...this stuff is hot! (Although, a "Grape Steam Facial" does sound like something you'd pay a lot for at a spa...)
Stir the skins and pulp together and add up to 6 cups of sugar per 2 quarts (starting measurement) of grapes. We prefer our jam to be a little more tart, so I cut the sugar to approximately 4 cups per 2 quarts.
Gradually bring the mixture up to a boil, and continue stirring until the sugar is completely dissolved. Continue stirring while boiling rapidly until the jam reaches the gelling point.
I test the gelling point by placing a little jam on a cold plate and bringing it to room temperature by cooling it rapidly in the freezer. Once cooled, drag your finger through the middle, and see if the jam holds the separation you've made.
Ladle into glass jars that have been warmed in a hot water bath. (Hot jam in cold jars = broken glass!!)

*If you are planning on canning/preserving the jam, leave 1/4 inch headspace and process 15 minutes in a boiling-water canner.
As always, from The Allergy Safe Kitchen, I wish you "Good Cooking, and Safe Eating"!
*Photo credits: All photos taken by Aidan Van Horn
Monday, October 6, 2014
Quick Stir Fry
It's 5 o'clock, everyone is asking me what's for dinner....I don't have a clue. (Every mom knows the feeling, right?) Our family has multiple food allergies, therefore we can't just "order out" in a pinch, so where do I go? To the fridge! I pull out some napa cabbage, scallions, oranges, leftover roast chicken, and bok choy. Dinner just revealed itself to be Quick Stir Fry! Rice, soy sauce, garlic, and chicken stock round out the ingredient list, and now I'm feeling confident.

*This recipe is peanut-free, tree nut-free, dairy-free, fish-free, shellfish-free, and egg-free. As always, check this ingredient list and your local products to make sure that this recipe is allergy safe for your family and/or friends!
Wednesday, August 6, 2014
Dessert Hobo Pies

Ok, ok...wipe the drool off your face, and start gathering up the firewood for this camp classic!
At least once a summer, we break out the pie irons, and make pizza hobo pies. We use homemade sauce, Earth Balance to grease the irons, safe bread, turkey pepperoni or sliced Al Fresco chicken sausage, and Follow your Heart Vegan Cheese Alternative. Delish!
This year, we really wanted to make dessert pies too, and here's what we came up with:
*This recipe is peanut-free, tree nut-free, dairy-free, egg-free, fish-free, and shellfish-free. As always, check this ingredient list and your local products to make sure that this recipe is allergy safe for your family and/or friends!
"Not S'mores" (we couldn't come up with a better name, it was late...)
Ingredients: (makes 2 dessert pies)
4 slices white sandwich bread
Earth balance bars
graham crackers
enjoy life chocolate chips
Sunbutter - creamy
Dairy-free mini-marshmallows
Cinnamon Sugar
Cast iron pie iron (ours is a double, so that's how I'm writing this recipe)
Directions:
- Make a campfire! Let it burn down a little. You won't need a big flame, but you will need hot coals. Also, make sure you have a safe place to put the iron down when it comes out of the fire, and also a potholder or "Ove' Glove".
- Heat the pie iron in the fire.
- Pull the iron out and open it. Grease the inside of both sides of the iron with Earth Balance.
- Place two pieces of bread in the cavity of one side of the iron.
- Place a graham cracker on each piece of bread. Top generously with mini-marshmallows chocolate morsels.
- Spread a layer of Sunbutter on the remaining two slices of bread and top off the sandwiches in the iron.
- Carefully close the pie iron and place among the hot coals of the campfire. Do not put the iron in the direct flames, it will burn the bread.
- After a few minutes, flip the pie iron.
- Cooking time will vary depending on how hot your coals are! Check after 5 minutes. The pie is done when both sides are golden brown.
- Remove pie irons to your heat safe surface. Open the irons and slather just the top side of the pie with Earth Balance. Then, sprinkle on a generous amount of cinnamon sugar!
- Serve and enjoy!!!

As always, from The Allergy Safe Kitchen, I wish you "Good Cooking, and Safe Eating"!
Saturday, July 12, 2014
Kicked Up Sloppy Joes

Who doesn't love Sloppy Joes? This is an often requested dinner in our house. Here's my original recipe for Kicked Up Sloppy Joes. I replace the "pre-made" Manwich sauce with tomato sauce and spices for a relatively additive-free meal! I also use organic ground beef for a more tender texture and frankly, better flavor. (Ground turkey works well too.) Organic meats can be expensive, but buying organic ground meat is a budget conscious way to get a higher quality meat into the menu rotation, even for a big family like ours!
*This recipe is peanut-free, tree nut-free, dairy-free, egg-free, gluten-free, soy-free, fish-free, and shellfish-free. As always, check this ingredient list and your local products to make sure that this recipe is allergy safe for your family and/or friends!
Ingredients:
2 pounds organic ground beef
1 15oz.can tomato sauce
1 15 oz. can fire roasted diced tomatoes
3 Tbsp. Tomato paste
1/2 tsp onion powder
1/2 tsp garlic powder
1 red bell pepper, diced
1 yellow bell pepper, diced
1 poblano pepper, diced
1 large sweet onion, diced
4 cloves minced garlic
chopped parsley
kosher salt
Directions:
1. In a large skillet, brown the ground beef. Remove from skillet,
and set the beef aside.
2. Sauté peppers and onions until slightly softened.
3. Add garlic and sauté for 1 more minute.
4. Add beef back into the skillet.
5. Add 2 cans tomatoes, onion powder, garlic powder, and a
hefty pinch of kosher salt.
6. Heat through, finish with parsley and serve! (Serve on top of
your family's favorite buns!)
As always, from The Allergy Safe Kitchen, I wish you "Good Cooking, and Safe Eating"!
Saturday, February 1, 2014
Brownie Stackers - Video tutorial!
Wondering if there's a special sweet treat you can serve for the "big game"? Here's a tutorial for:

As always, from The Allergy Safe Kitchen, I wish you "Good Cooking, and Safe Eating"!
Tuesday, January 28, 2014
Leek tops - another valuable freebie!
One of my family's favorite winter dinners is Potato Leek Soup with homemade artisan bread. The recipe calls for a lot of leeks, which leaves me with a counter full of beautiful bright green leek tops. I try to make the most out of each food item I purchase, so I always save my leek tops for making stock. Here's how I do it!

Rise them just as you would the white tender part that gets cooked. Fill a deep bowl with cold water. Roughly chop the leeks and add them to the water. Agitate them a bit with your fingers and then let them sit for 10-20 minutes while you give yourself a manicure. (Just making sure you were paying attention there...) The leeks will float and the dirt will sink to the bottom.

Lift the leeks gently from the water, place them on paper towels, and pat dry.

Look at all the dirt left in the bowl! That definitely doesn't belong in my soup!

Portion the leeks out into several quart sized freezer bags. I always label my bags with a "Use By" date so I don't end up with a freezer full of freezer burned foods. (I have a full sized, stand alone freezer, so I'm pretty comfortable with 1-3 months for most of my frozen foods.)

Next time you are making stock, add a bag of frozen leeks instead of an onion! Leek tops are another valuable "freebie" in my kitchen!
As always, from The Allergy Safe Kitchen, I wish you "Good Cooking, and Safe Eating"!
Friday, January 24, 2014
The Most Valuable Freebie in my Kitchen...
There is one food "freebie" that I use religiously in my kitchen. It is...bacon fat! I'm going old school right now, and suggesting that all of you, my dear readers, maintain a jar of bacon fat. Once you start cooking with it, you'll be seeing that beautiful white deliciousness as culinary gold.

To collect it, simply drain the fat out of the pan, or out of one of those nifty microwave bacon racks, into a heat safe container, I usually use a bowl. Allow the fat to cool a bit before moving it to a mason jar. Then, cover and store. I prefer to store mine in the fridge, but you could store it in the freezer if you have a copious amount that you won't use within a month or so.
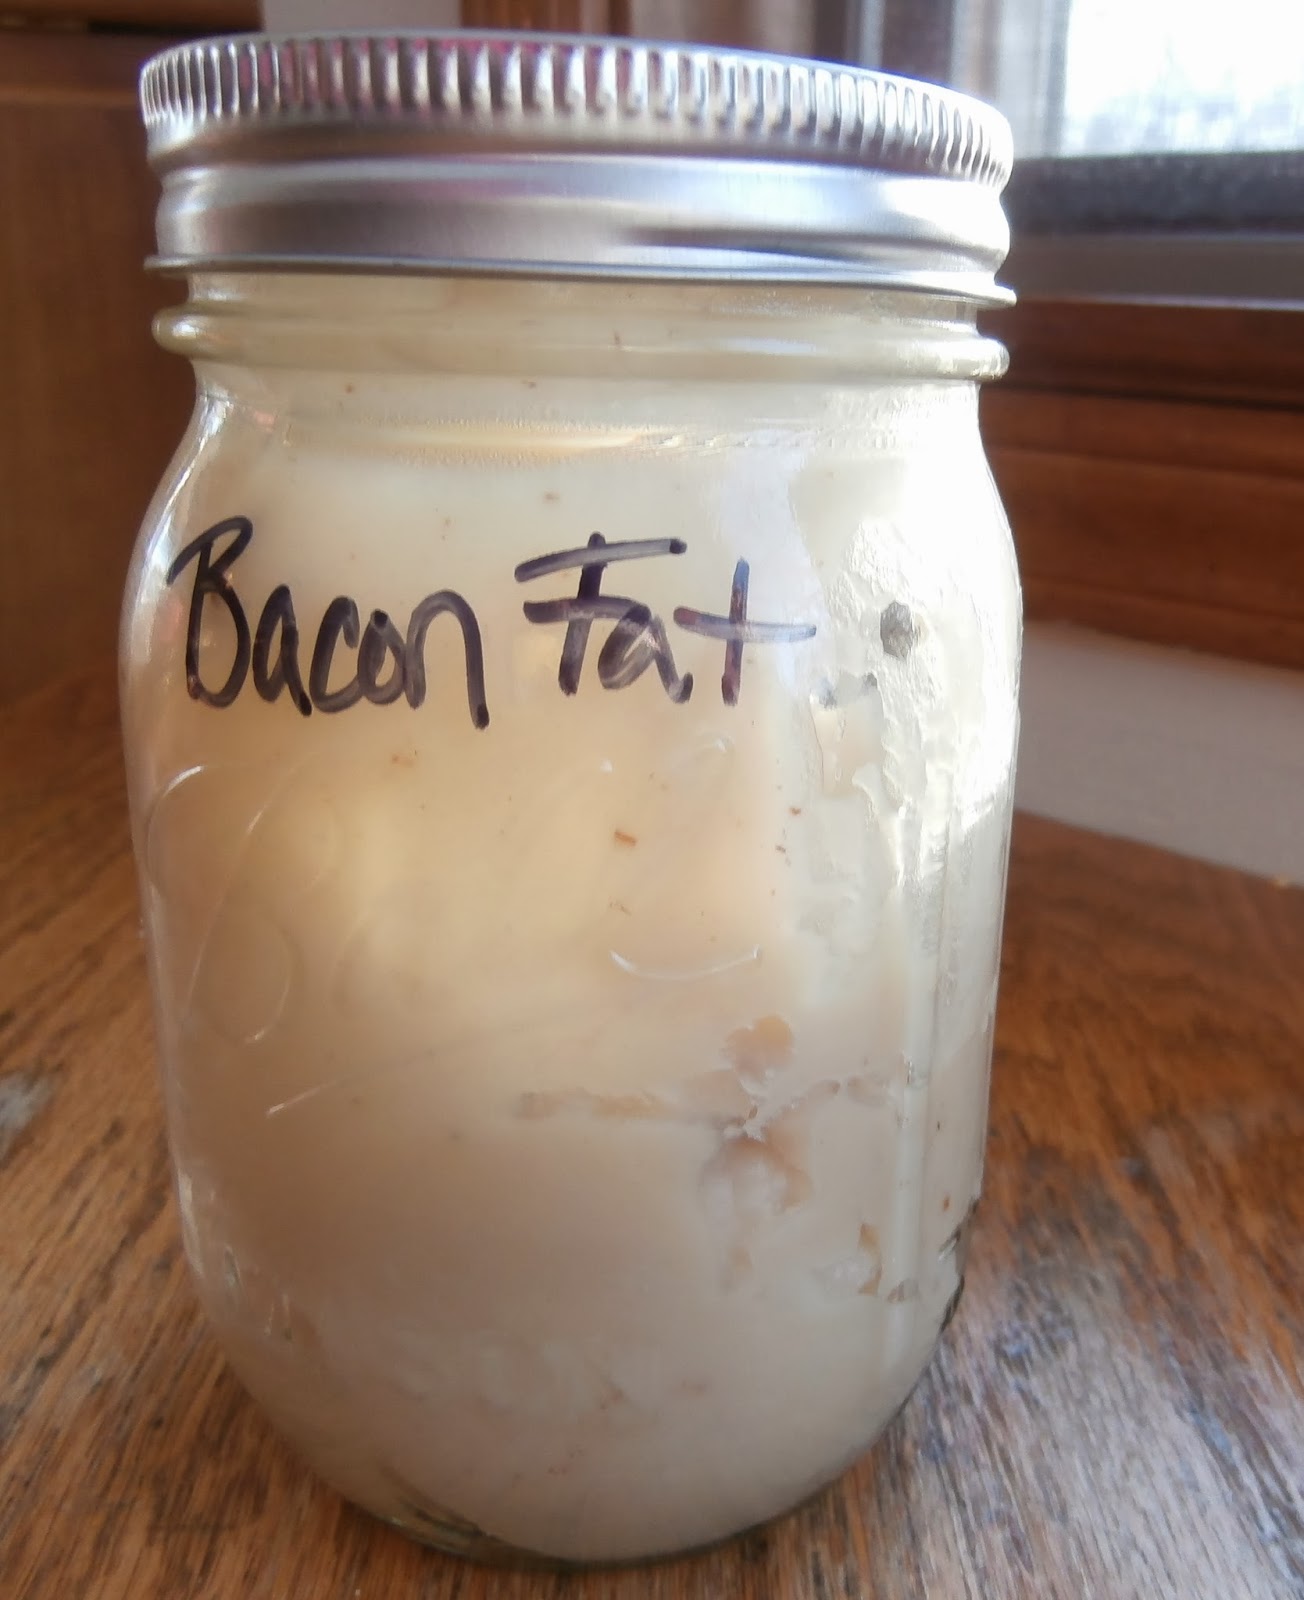
There are two camps on whether or not to strain out the little brown bits from your bacon fat. Some cooks always strain it, and some never do. If you are going to use it fairly quickly, I vote to leave those golden brown bits in for the extra flavor they bring to the party. However, if you'll be storing the fat for a while, strain them out, as they contribute to turning the fat rancid more quickly.
To collect it, simply drain the fat out of the pan, or out of one of those nifty microwave bacon racks, into a heat safe container, I usually use a bowl. Allow the fat to cool a bit before moving it to a mason jar. Then, cover and store. I prefer to store mine in the fridge, but you could store it in the freezer if you have a copious amount that you won't use within a month or so.
There are two camps on whether or not to strain out the little brown bits from your bacon fat. Some cooks always strain it, and some never do. If you are going to use it fairly quickly, I vote to leave those golden brown bits in for the extra flavor they bring to the party. However, if you'll be storing the fat for a while, strain them out, as they contribute to turning the fat rancid more quickly.
 |
| Apple Maple Chicken Sausage browned with bacon fat. Breakfast doesn't get much better than this. |
*I also suggest using organic bacon. Yep, I used the "o" word. Calm down, I know, I can hear you now..."It's so expensive!" Yes, it is a bit more pricey than "regular" bacon, BUT, you are getting a quality product that does not contain synthetic chemicals, additional nitrites and nitrates, or GMO laden ingredients. AND if you save the rendered fat, you'll have beautiful organic cooking fat for other dishes. This is one instance where I recommend consistently buying organic.
As always, from The Allergy Safe Kitchen, I wish you "Good Cooking, and Safe Eating"!
Friday, January 17, 2014
Crock Pot Stock
For years, I've been making delicious homemade chicken stock in my giant pot. And, if I need a LOT all at once, I'll still do it that way. But, recently, I've started making amazingly rich stock while I sleep. Yep, while I sleep. This isn't some kind of domestic diva transcendence, I'm just putting that workhorse of the kitchen to good use: the humble slow cooker, a.k.a. the crock pot. I make one or two whole chickens per week in the crock pot. I use them for chicken salad, sandwiches, for chicken with pasta, to provide tender meat for the babies, etc. I have done this for a long time, and I always got a little bit of concentrated stock in the bottom of the crock pot. In the past I would save it, freeze it, and then add it to the "big pot" when making a big batch of stock. No more, readers, No. More. Now I have realized I can get a whole crock pot full of that amazing, concentrated stock with very little extra effort! Here's how:
*This recipe is peanut-free, tree nut-free, dairy-free, egg-free, wheat-free, soy-free, fish-free, and shellfish-free. As always, check this ingredient list and your local products to make sure that this recipe is allergy safe for your family and/or friends!
Crock Pot Stock
Ingredients:
1 whole chicken (3 lbs-ish)
1 bay leaf
Kosher Salt
2 peppercorns
2 sprigs of thyme (optional)
1 large carrot, roughly chopped
1 stalk celery, roughly chopped
1 slow cooker
1/4 cup water
Directions:
1. Place the carrots and celery in the bottom of the slow cooker.
2. Place the chicken in the slow cooker.
3. Add bay leaf, thyme, peppercorns, and water to the slow cooker.
4. Salt liberally with kosher salt.
5. Put the lid on, turn on the slow cooker to low and cook for 4
hours.
6. Remove just the chicken from slow cooker and strip all the meat
off the bones. Use this for chicken salad, sandwiches, fajitas, etc.
7. Place all the bones and skin back into the slow cooker and fill
with water.
8. Cook on low overnight, up to 24 hours.
9. Strain solids out of the stock.
10. Place stock in a container and refrigerate until the fat coagulates
on the top.
11. Skim off fat and store it in a mason jar in the fridge for future
cooking.
12. Now, your stock is ready to use or freeze! ( I usually get
between 4-6 cups per crockpot)
*This recipe is peanut-free, tree nut-free, dairy-free, egg-free, wheat-free, soy-free, fish-free, and shellfish-free. As always, check this ingredient list and your local products to make sure that this recipe is allergy safe for your family and/or friends!
Crock Pot Stock
Ingredients:
1 whole chicken (3 lbs-ish)
1 bay leaf
Kosher Salt
2 peppercorns
2 sprigs of thyme (optional)
1 large carrot, roughly chopped
1 stalk celery, roughly chopped
1 slow cooker
1/4 cup water
 |
| Stock bubbling away - I wish you could smell it! Yum! |
Directions:
1. Place the carrots and celery in the bottom of the slow cooker.
2. Place the chicken in the slow cooker.
3. Add bay leaf, thyme, peppercorns, and water to the slow cooker.
4. Salt liberally with kosher salt.
5. Put the lid on, turn on the slow cooker to low and cook for 4
hours.
6. Remove just the chicken from slow cooker and strip all the meat
off the bones. Use this for chicken salad, sandwiches, fajitas, etc.
7. Place all the bones and skin back into the slow cooker and fill
with water.
8. Cook on low overnight, up to 24 hours.
9. Strain solids out of the stock.
10. Place stock in a container and refrigerate until the fat coagulates
on the top.
11. Skim off fat and store it in a mason jar in the fridge for future
cooking.
12. Now, your stock is ready to use or freeze! ( I usually get
between 4-6 cups per crockpot)
As always, from The Allergy Safe Kitchen, I wish you "Good Cooking, and Safe Eating"!
Tuesday, January 7, 2014
Snow Day Muffins

We are in the middle of a blizzard today! The wind chills are in the negative 30s and it is snowing sideways! To celebrate our family snow day, we made Snow Day Muffins! Just make your favorite muffin recipe and dust the top with powdered sugar (snow!), it's that simple to make the little ones feel special! We made cranberry sauce muffins and used some leftover snowman cupcake picks to really make it feel like a spectacular winter holiday.
We are in the middle of a blizzard today! The wind chills are in the negative 30s and it is snowing sideways! To celebrate our family snow day, we made Snow Day Muffins! Just make your favorite muffin recipe and dust the top with powdered sugar (snow!), it's that simple to make the little ones feel special! We made cranberry sauce muffins and used some leftover snowman cupcake picks to really make it feel like a spectacular winter holiday.
*This recipe is peanut-free, tree nut-free, dairy-free, egg-free, fish-free, and shellfish-free. As always, check this ingredient list and your local products to make sure that this recipe is allergy safe for your family and/or friends!
Monday, December 9, 2013
My first cookbook!

Tuesday, January 22, 2013
Serious Comfort Food Series - Potato Leek Soup
Potato Leek Soup
This is a wonderful, hearty, healthy soup for a cold day. My kids actually request leftovers the next day! There isn't any dairy in this recipe, and yet blending the soup with an immersion blender yields a creamy potato texture. Substitute vegetable stock for chicken stock for a vegan soup. This Potato Leek Soup recipe freezes and defrosts beautifully, so make a pot and save some for later! |
|||||||||
| *This recipe is peanut-free, tree nut-free, dairy-free,
egg-free, soy-free, wheat-free, fish-free, and shellfish-free. Top 8 Free! As always,
check this ingredient list and your local products to make sure that this
recipe is allergy safe for your family and/or friends! |
Tuesday, January 15, 2013
Serious Comfort Food Series - Sorbet Fruit Cup
Sorbet
Fruit Cups
When I
was a little girl, my doctor said that the best thing for a sore throat was ice
cream. My six-year old self loved him
for that! But, with several dairy-allergic children, ice cream is not a
possibility. Sure, there are great
soy-based alternatives, and even some coconut-based frozen treats, but they are
in very tiny, very expensive containers.
I needed something that would be lower cost, safe, and maybe even
healthy! Made with only ½ cup of sugar
for the entire batch, this recipe is healthy and packed with goodies like
vitamins and antioxidants from the fruit! I came up with these Sorbet Fruit
Cups and the kids loved them!!!
*This recipe is peanut-free, tree nut-free, dairy-free,
egg-free, wheat-free, gluten-free, soy-free, fish-free, and shellfish-free. As always, check this
ingredient list and your local products to make sure that this recipe is
allergy safe for your family and/or friends!
 |
| Getting ready to make sorbet! |
Subscribe to:
Comments (Atom)